Home
It's Router Time Folks
- Details
- Written by: ken
- Category: Uncategorised
- Hits: 236
Hello Folks,
The Solar project for off grid garage is nearly complete.
I said I would talk about a project where I want to build my own Network Router for home. As of 22 Sep 2025, I started this project. It is a big learning curve.
Questions I had to ask:
Do you want to configure everything on the router device you purchased or configure on some left over old computer parts.
How much money do you want to spend on power
Minimum Requirements:
I need 2.5 GB network Interfaces at a minimum
Support for 10 GB would me nice as well
Can I virtualize the router in the future? If I so desire
Nicety/added feature Virtualization would allow for implementing AdGuard and other products
Preferred Router Operating systems are limited: Open Source of Course
Choices are limited: (I had to ensure the products would be around for support)
PFSense (https://www.pfsense.org/)
OPNSense (https://www.pfsense.org/)
VyOS (https://vyos.io/)
So PFSense is the original Router OS, and then OPNSense is a fork of PFSense.
I first looked at Pfsense. But, I could not get the Router OS to download. I think I need to create a logon and then maybe be able to download it. I also learned that PFSense was merged under the wing of Netgear. Maybe some business decision is driving me from not downloading it.
So I went to Router OS dinner plate and looked at OPNsense which is affiliated with Deciso brand and provides their own OPNSense hardware if don’t want to build your own. https://shop.opnsense.com/
OPNSense, because it is open source, I could download it...Hooray
I then went to the VyOS Web Site and I found I could download the rolling release of 1.5 something…Hooray again
Now for the Brain hurting learning curves.
I really wanted to try OPNSense since it was a web graphical user interface(GUI) It easily installed and provided options in the initial deploy. Also, Youtube and the web provide good examples how to configure this Router OS.
Ok, So I installed it and tried to configure it. It was simple and straight forward and even provided a configuration wizard.
Oh, by the way, I thank the Youtube channel ServeTheHome for introducing me to a simple mini pc I could use as a router/firewall device.
So device I chose has a smaller foot print and was based on Intel I226 and Marvel AQC113c chipsets
It is a barebone KETUOPU. NO NVME or SODIMM Memory. I had some of that on hand to stand up this machine. See link below for the barebones which is currently unavailable on Amazon.
https://www.amazon.com/dp/B0FF54PWB4?ref=ppx_yo2ov_dt_b_fed_asin_title&th=1
6 LAN Fanless Mini PC, K305H6 i3-N305 up to 3.8GHz, Barebones No Ram No SSD, 2X Marvell 10G, 4xI226-V 2.5 Gigabit LAN, AES-NI, Create a NAS, Office Small PC Home Server Network Gateway
Now that the hardware is setup I installed OPNSense which is a FreeBSD based operating system. It is great for newbies. But, woe is me if I did not find out until later that this Router OS does not have drivers for the Marvell 10GB AQC113c chip set. Oh, that was a limitation after Learned about that. Now that I am on Fiber I wanted the 10GB speed to access the ISP.
So flipped a coin in my mind and had to think do I want to use this Router OS and not have full use of the device as a router or try the VyOS which does not have a GUI and is more similar to Cisco network appliances which are configured at the command line.
Start over again from scratch:
Used Rufus to make a bootable USB image. I then installed the VyOS Live version onto this device.
Success, It recognized all the network interface cards and installed the drivers.
Now came the challenge:
Since I don’t know Cisco devices, yet alone setup any network device by command Line I had a lot to learn between VyOS web site. It is nice they provide an online read me manual pages as well as PDF you can download to read and configure the device by.
I then used Youtube to assist in my learning curve. So much to learn for a Windows Server guy.
I found the 5 episode series from Level Zero Networking channel to understand the basics (https://www.youtube.com/results?search_query=level+zero+networking)
So how did I do in configuring this Router. That is to be tested in the future. Just to know ChatGPT and Grok AIs were involved after a friend stated I should use these generative AIs and see what information they provide.
27 Oct 2025
UPDATE #1:
Hello Folks
I have been working hard to learn these Firewall/Router Products. I spent a long time trying to learn Vyos and was successful in deploying command line style configurations to include setting it up wit a Double NAT scenario. It was awesome to see the Minisforum Mini PC pull an IP Address and be able to get to websites. The Vyos Configuration looked something like this with messed up firewall rules I did not fully understand...It was awesome.
Take these commands and reconfigure for bridged interfaces on eth2, eth3, and eth4, and configure dhcp scope 192.168.60.0/24 for eth1 thru eth4
Provide output in notepad format, and break up into readable sections:
set firewall group interface-group LAN interface 'eth0'
set firewall group interface-group LAN interface 'eth1'
set firewall group interface-group LAN interface 'eth4'
set firewall group interface-group WAN interface 'eth3'
set firewall group network-group NET-Inside-v4 network '192.168.60.0/24'
set firewall group network-group NET-Inside-v4 network '192.168.50.0/24'
set firewall ipv4 forward filter rule 5 action 'accept'
set firewall ipv4 forward filter rule 5 state 'established'
set firewall ipv4 forward filter rule 5 state 'related'
set firewall ipv4 forward filter rule 10 action 'drop'
set firewall ipv4 forward filter rule 10 state 'invalid'
set firewall ipv4 input filter rule 5 action 'accept'
set firewall ipv4 input filter rule 5 state 'established'
set firewall ipv4 input filter rule 5 state 'related'
set firewall ipv4 input filter rule 10 action 'drop'
set firewall ipv4 input filter rule 10 state 'invalid'
set interfaces ethernet eth0 address 'dhcp'
set interfaces ethernet eth0 description 'WAN-Outside'
set interfaces ethernet eth0 hw-id '00:e0:4c:69:73:70'
set interfaces ethernet eth0 offload gro
set interfaces ethernet eth1 address '192.168.80.1/24'
set interfaces ethernet eth1 description 'Second Port Down on NIC'
set interfaces ethernet eth1 hw-id '00:e0:4c:69:73:71'
set interfaces ethernet eth1 offload gro
set interfaces ethernet eth2 address '192.168.70.1/24'
set interfaces ethernet eth2 description 'Third Port Down on NIC'
set interfaces ethernet eth2 hw-id '00:e0:4c:69:73:72'
set interfaces ethernet eth2 offload gro
set interfaces ethernet eth3 address '192.168.60.1/24'
set interfaces ethernet eth3 description 'Fourth Port Down on NIC'
set interfaces ethernet eth3 hw-id '00:e0:4c:69:73:73'
set interfaces ethernet eth3 offload gro
set interfaces ethernet eth4 address '192.168.50.246/24'
set interfaces ethernet eth4 description 'MGMT'
set interfaces ethernet eth4 hw-id '58:47:ca:7f:0d:1a'
set interfaces ethernet eth4 offload gro
set interfaces loopback lo
set nat source rule 100 source address '192.168.60.0/24'
set nat source rule 100 translation address 'masquerade'
set nat source rule 200 source address '192.168.60.0/24'
set nat source rule 200 translation address 'masquerade'
set service dhcp-server shared-network-name LAN subnet 192.168.60.0/24 lease '86400'
set service dhcp-server shared-network-name LAN subnet 192.168.60.0/24 option default-router '192.168.60.1'
set service dhcp-server shared-network-name LAN subnet 192.168.60.0/24 option domain-name '<domain name>'
set service dhcp-server shared-network-name LAN subnet 192.168.60.0/24 option name-server '192.168.60.1'
set service dhcp-server shared-network-name LAN subnet 192.168.60.0/24 range 0 start '192.168.60.14'
set service dhcp-server shared-network-name LAN subnet 192.168.60.0/24 range 0 stop '192.168.60.254'
set service dhcp-server shared-network-name LAN subnet 192.168.60.0/24 subnet-id '1'
set service dns forwarding allow-from '192.168.60.0/24'
set service dns forwarding allow-from '192.168.70.0/24'
set service dns forwarding allow-from '192.168.80.0/24'
set service dns forwarding domain <domain name> name-server 192.168.60.1
set service dns forwarding domain <domain name> name-server 192.168.70.1
set service dns forwarding domain <domain name> name-server 192.168.80.1
set service dns forwarding listen-address '192.168.60.1'
set service dns forwarding listen-address '192.168.70.1'
set service dns forwarding listen-address '192.168.80.1'
set service dns forwarding name-server 1.1.1.1
set service dns forwarding name-server 8.8.8.8
set service dns forwarding name-server 192.168.60.1
set service dns forwarding system
set service ntp allow-client address '127.0.0.0/8'
set service ntp allow-client address '169.254.0.0/16'
set service ntp allow-client address '10.0.0.0/8'
set service ntp allow-client address '172.16.0.0/12'
set service ntp allow-client address '192.168.0.0/16'
set service ntp allow-client address '::1/128'
set service ntp allow-client address 'fe80::/10'
set service ntp allow-client address 'fc00::/7'
set service ntp server 0.us.pool.ntp.org
set service ntp server 1.us.pool.ntp.org
set service ntp server 2.us.pool.ntp.org
set service ntp server 3.us.pool.ntp.org
set service ntp server time1.vyos.net
set service ntp server time2.vyos.net
set service ntp server time3.vyos.net
set service ssh listen-address '192.168.50.246'
set service ssh listen-address '192.168.60.1'
set service ssh port '22'
set system config-management commit-revisions '100'
set system console device ttyS0 speed '115200'
set system host-name 'TechKen-Lab-RTR'
set system name-server '8.8.4.4'
set system name-server '192.168.50.1'
set system name-server '1.1.1.1'
set system option reboot-on-upgrade-failure '5'
set system syslog local facility all level 'info'
set system syslog local facility local7 level 'debug'
set system time-zone 'America/Denver'
Then the Qotom network/MINI PC started dying and would shutoff and not power back up.
So, what was I to do. I googled and search for an alternative device to build upon. I came across Minisforum
MINISFORUM BD795i SE
https://www.minisforum.com/products/minisforum-bd795i-se
UPDATE #2:
So I found it on Amazon and bought it for testing sake. I bought a mini itx case for it a flex power supply. I also, bought a two port INTEL NIC for testing OPNSENSE.
Now the mini itx I bought is a 16 core AMD Laptop beast. I punished it in the development of the design I am going to stick with. It has been really stable so far.
I installed Proxmox and then tried to deploy OPNSENSE. Need less to say, I have a lot to learn on Firewall technology and the various platforms open source is deployed on.
I had to learn about Proxmox and configuring and labeling NICS to identify between the Realtek 8125 chip sets and the Intel I226 chip sets.
So the news about OPNSense. I have given up on it for right now until I learn more on how to configure Firewalls in their product line.
So I came across a really easy to deploy Firewall/Router that mimics the Home router appliances. It is LINUX Based and uses all the NICS in this system that I am throwing at it.
That Firewall is IPFIRE
I configured the IPFIRE virtual machine for 7 network interfaces in Proxmox:
Install the operating system and followed the instructions to set up a Red/Green Zone configuration.
To test the Firewall/Router I deployed a couple of linux workstations in Proxmox. A Zorin 18 machine and Kubuntu machine and configured them to use the NIC/Bridge connected to the IPFIRE Router.
These machines were able to talk to the Internet by using this virtualized router.
I have not put it in place to replace m old router yet. I need to figure out how to deploy Adguard on this machine or as a container/VM on the Proxmox server.
OK Folks that is a quick synopsis of what I have been doing
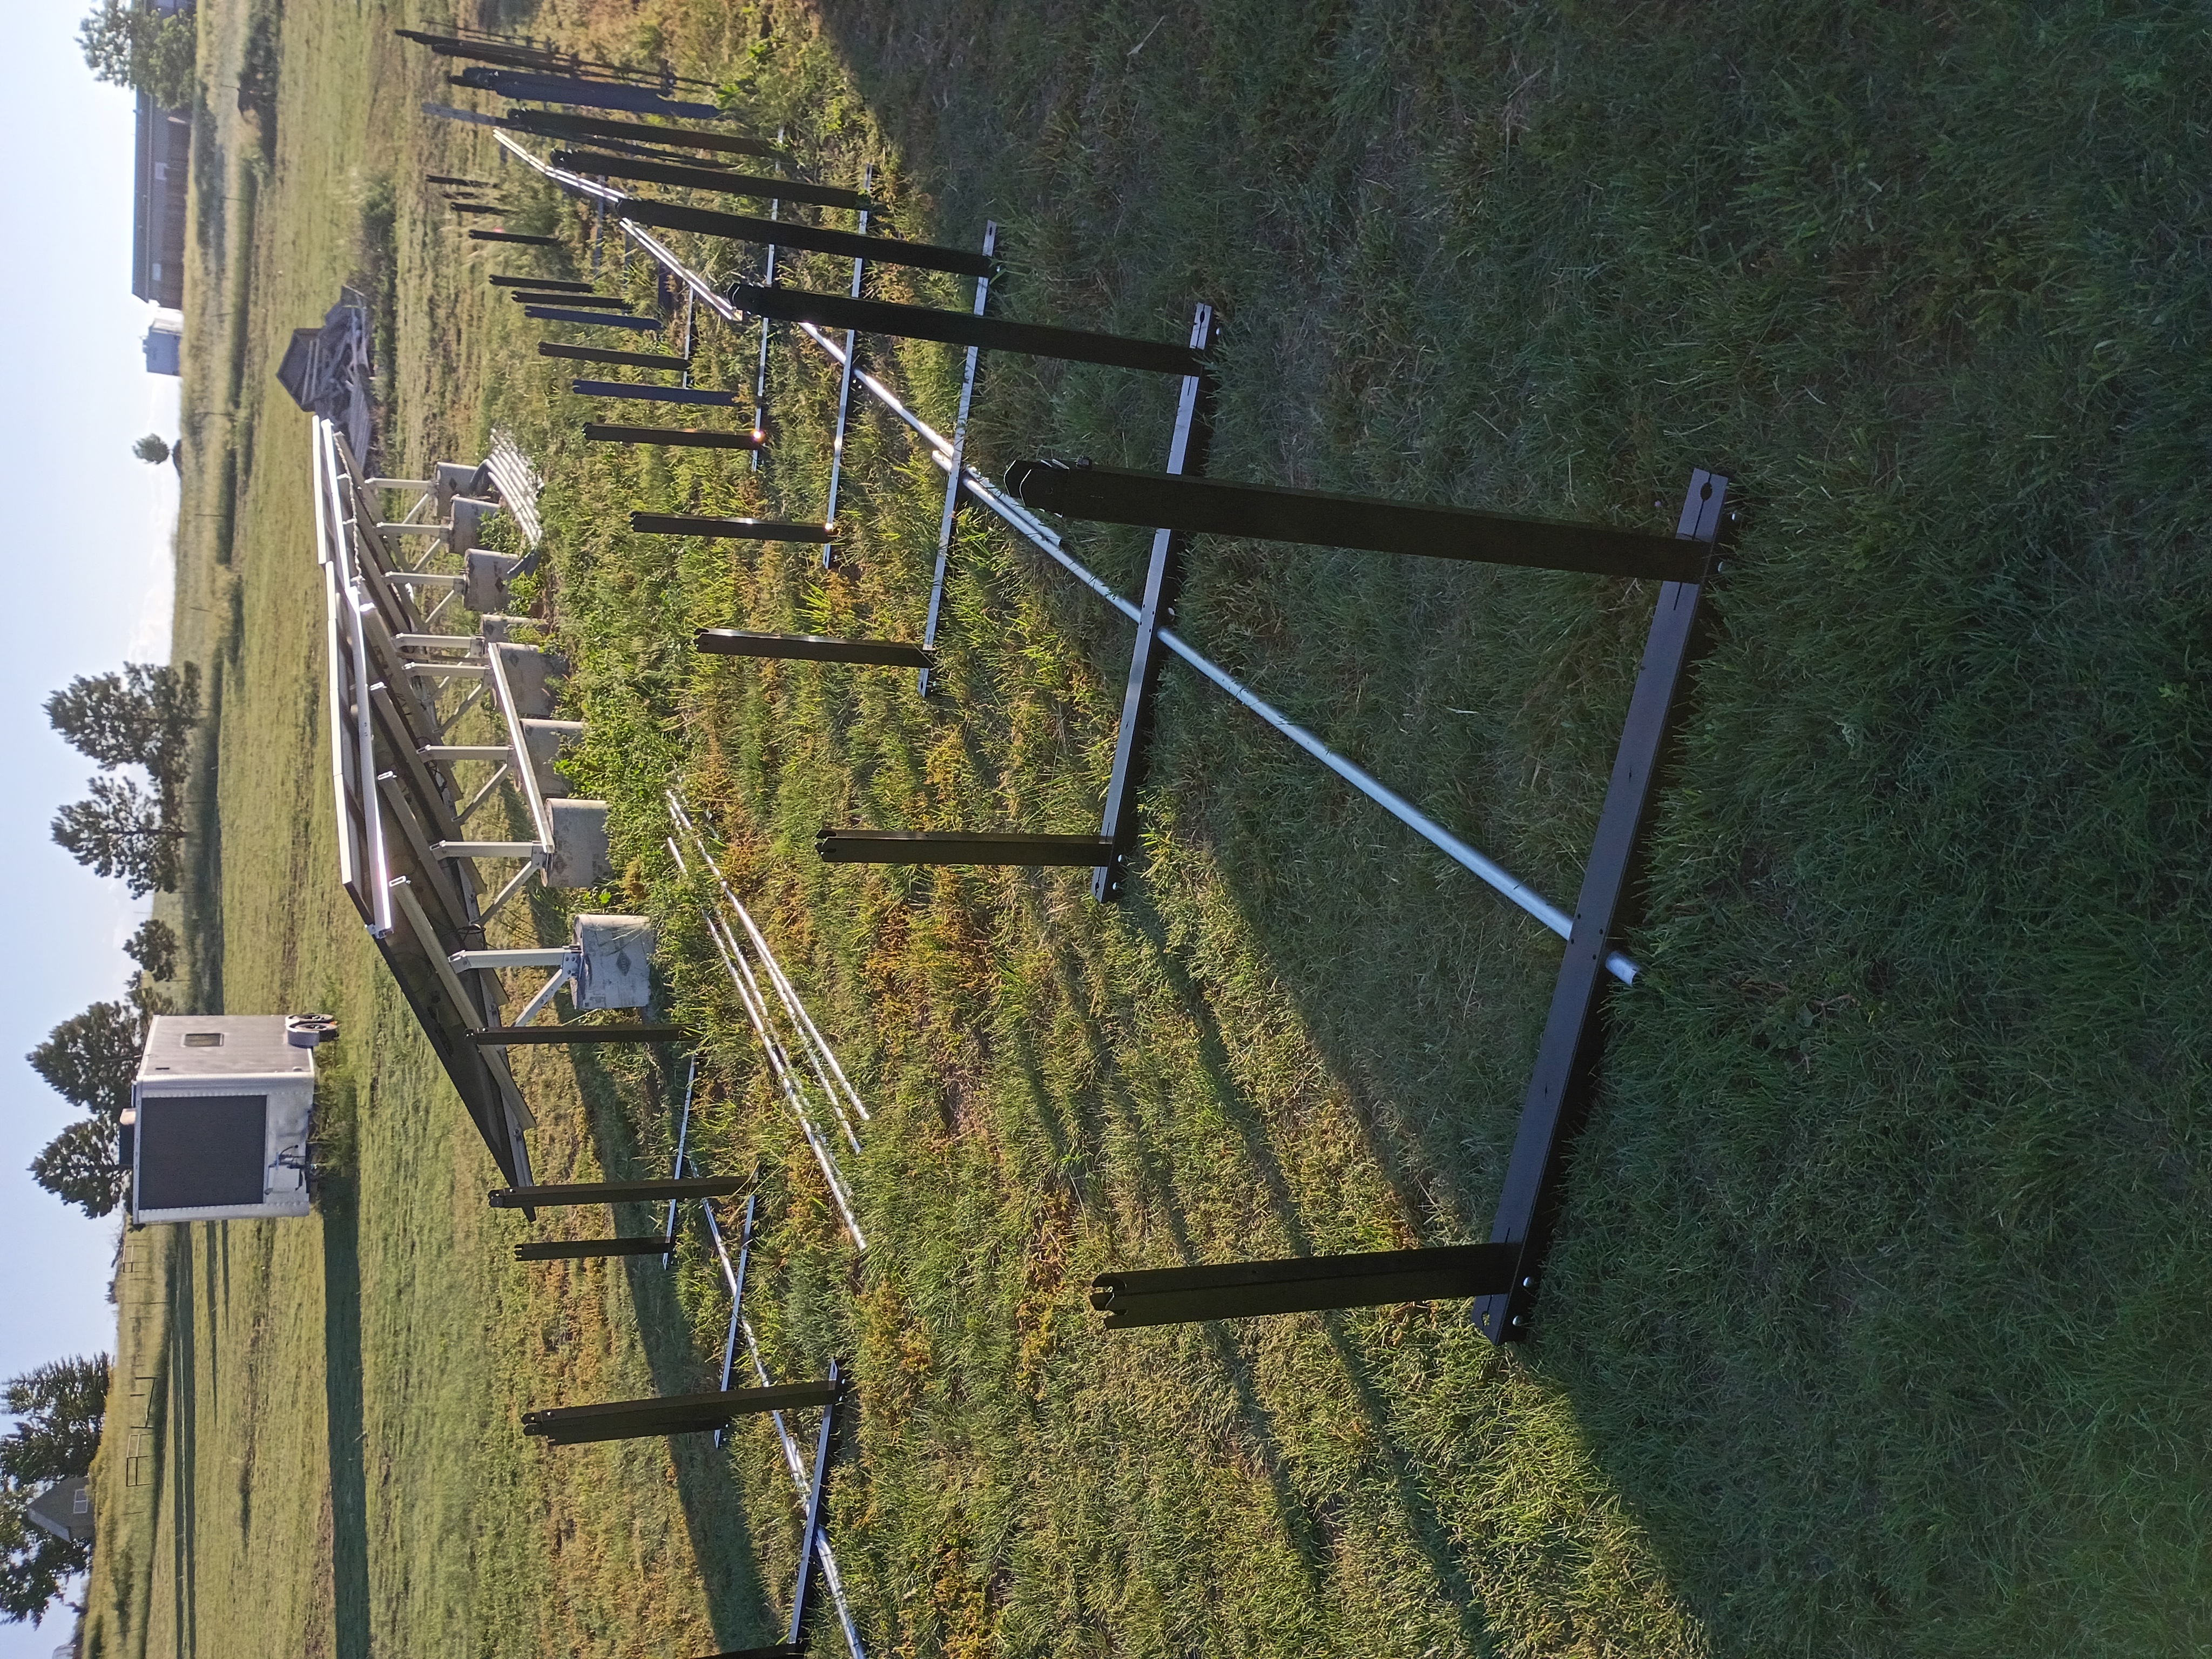
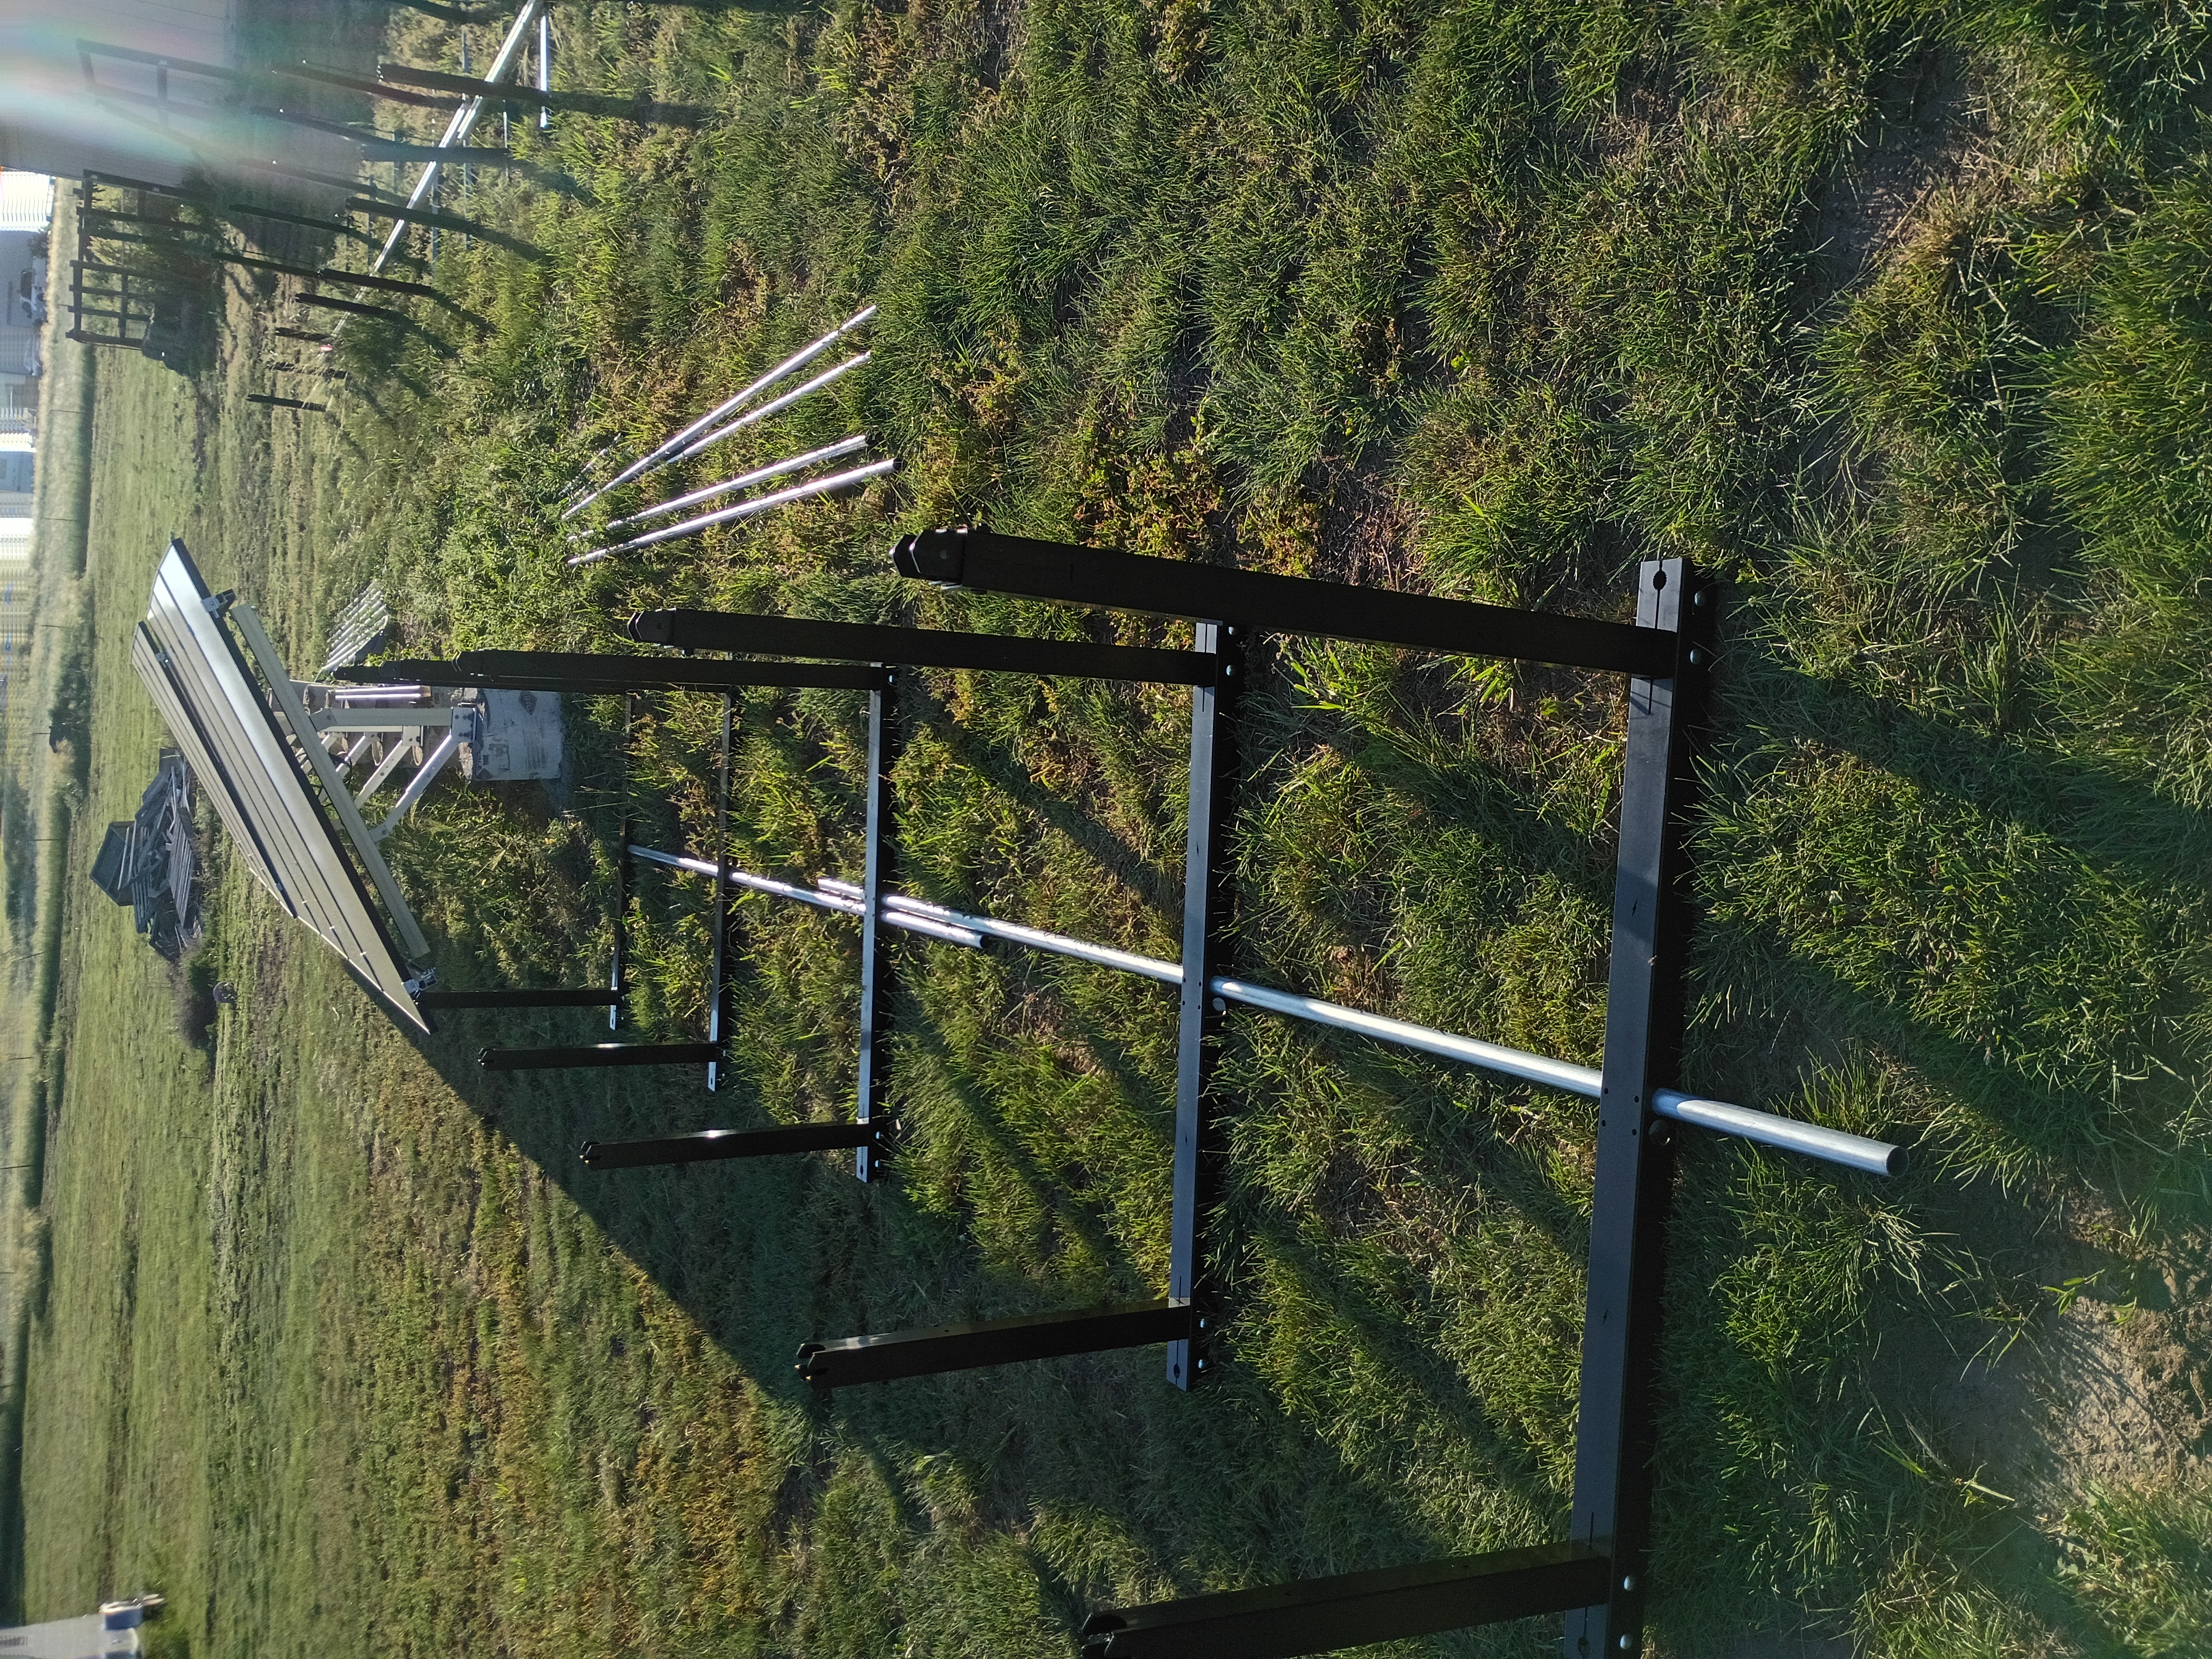
Let's Rack Some Solar
- Details
- Written by: ken
- Category: Uncategorised
- Hits: 445
Pics of the racking before and after
First the bad picture
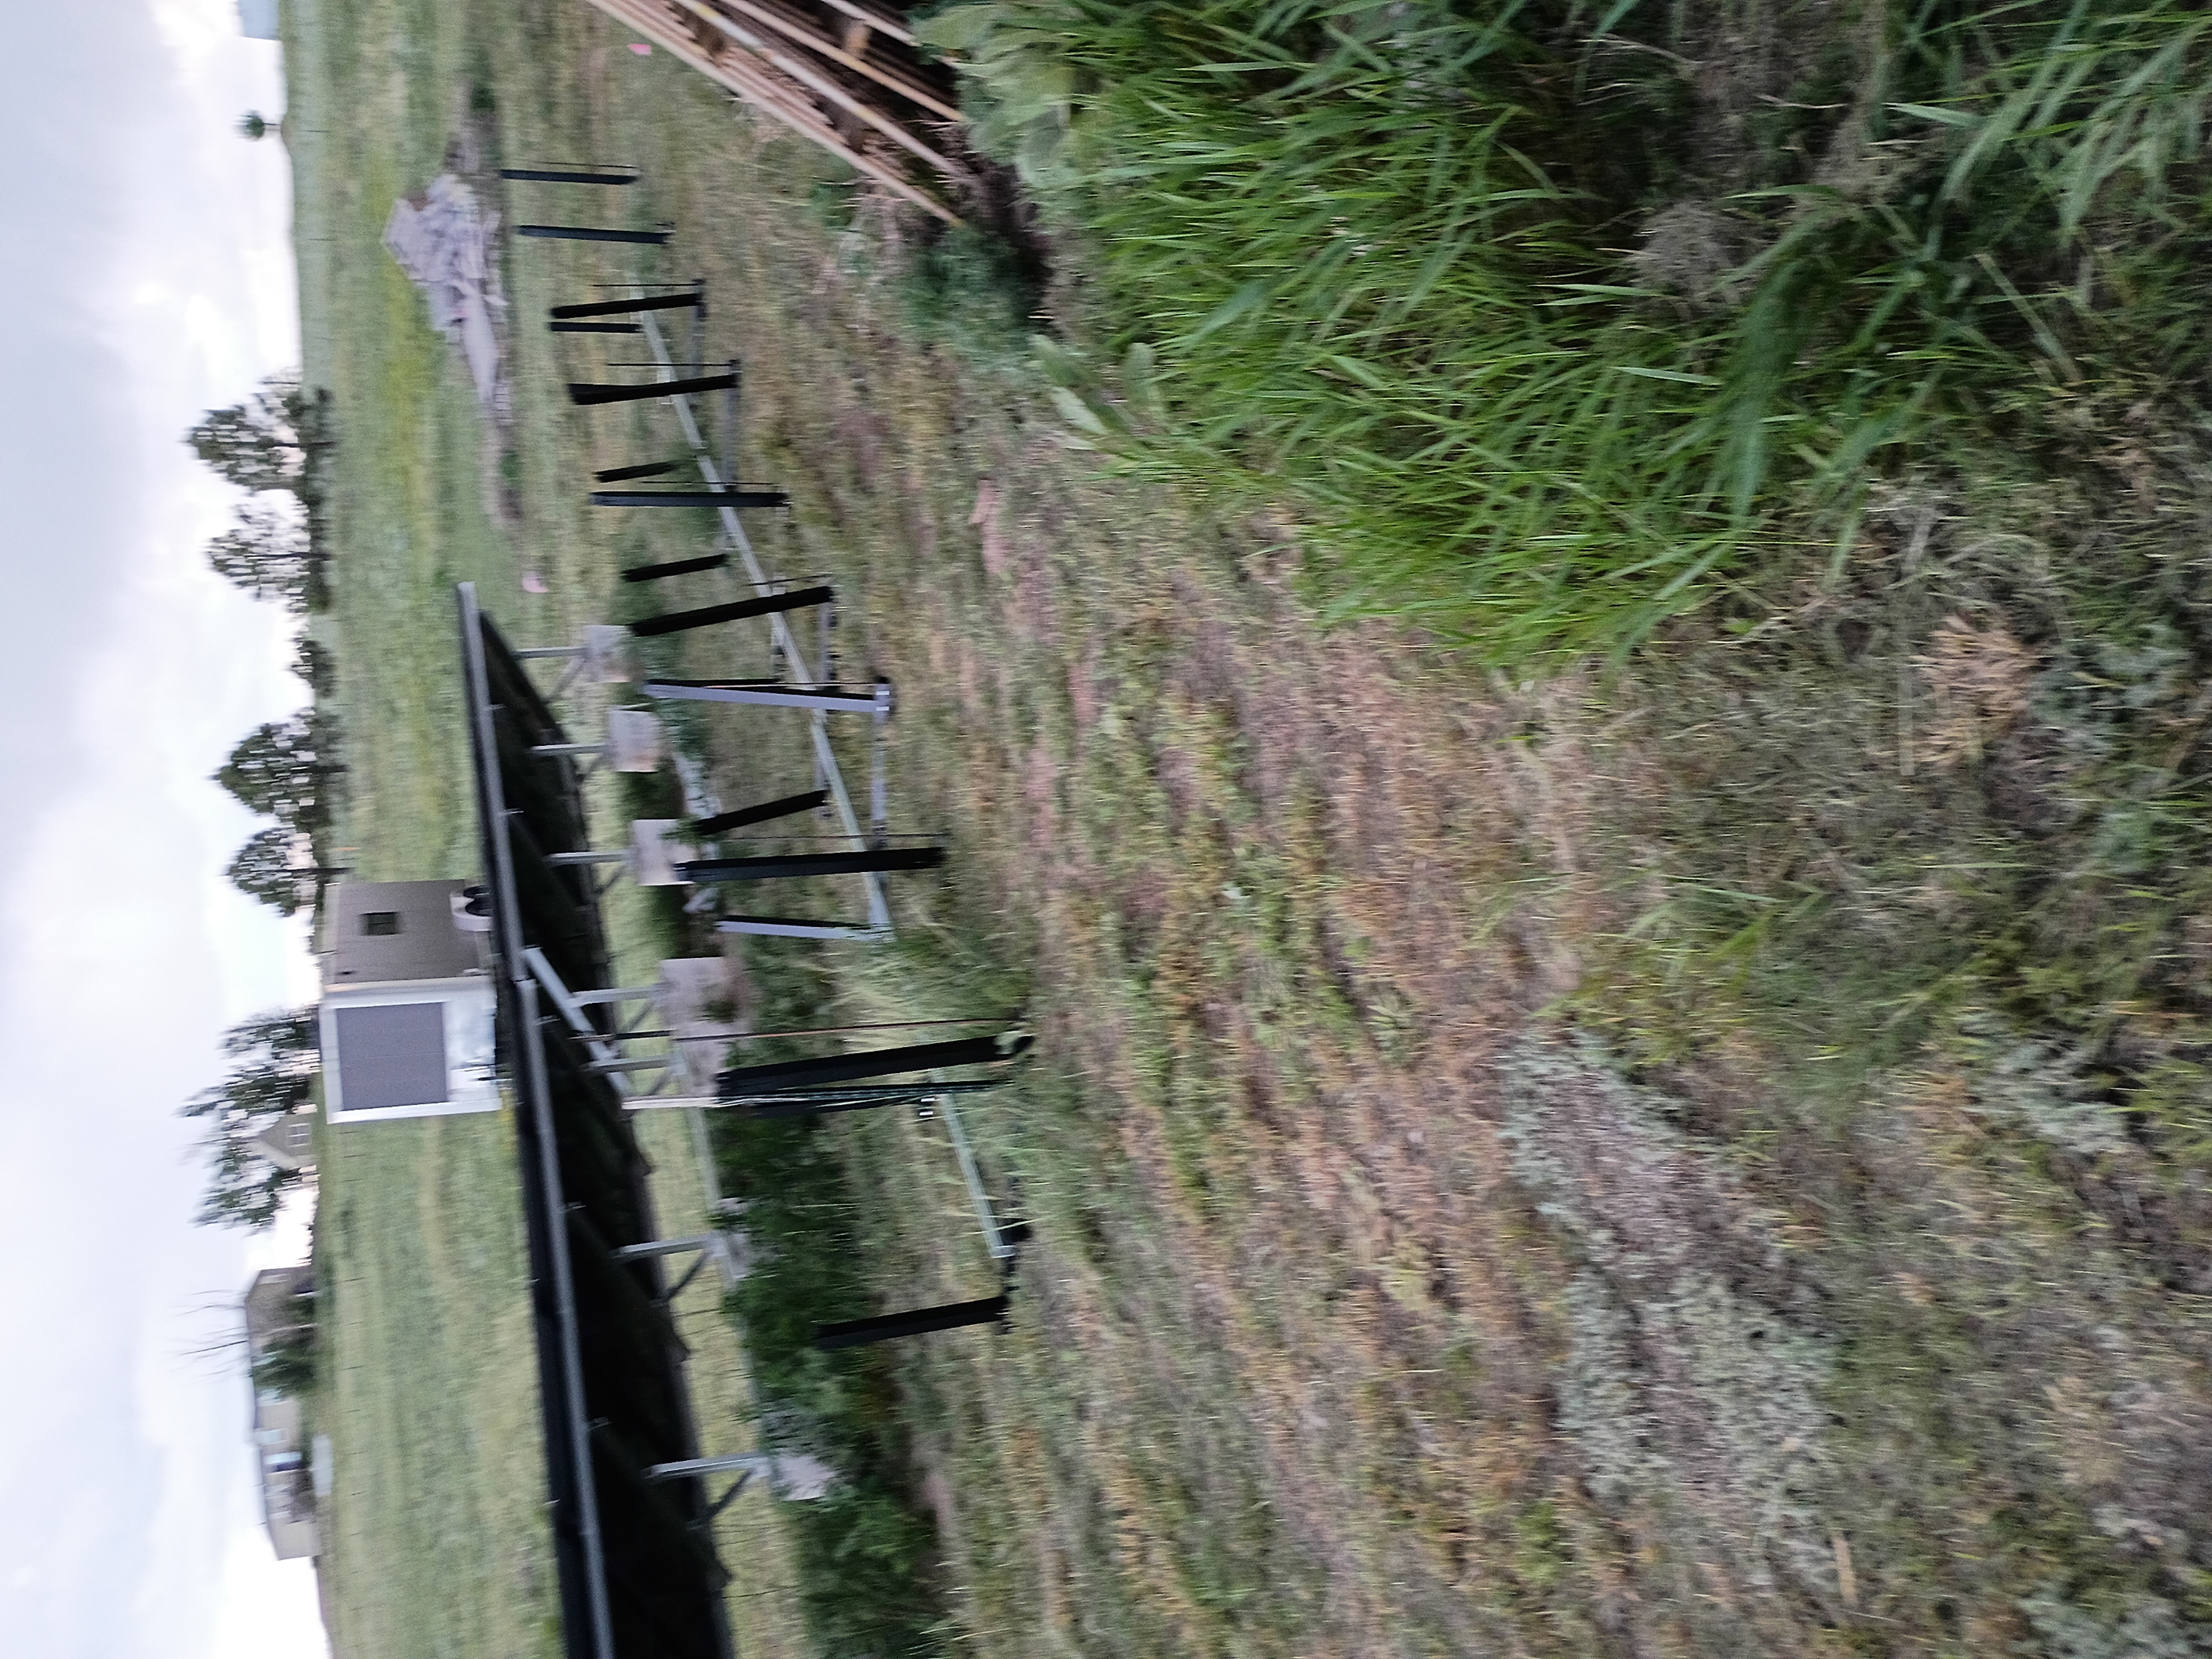
Now the rest
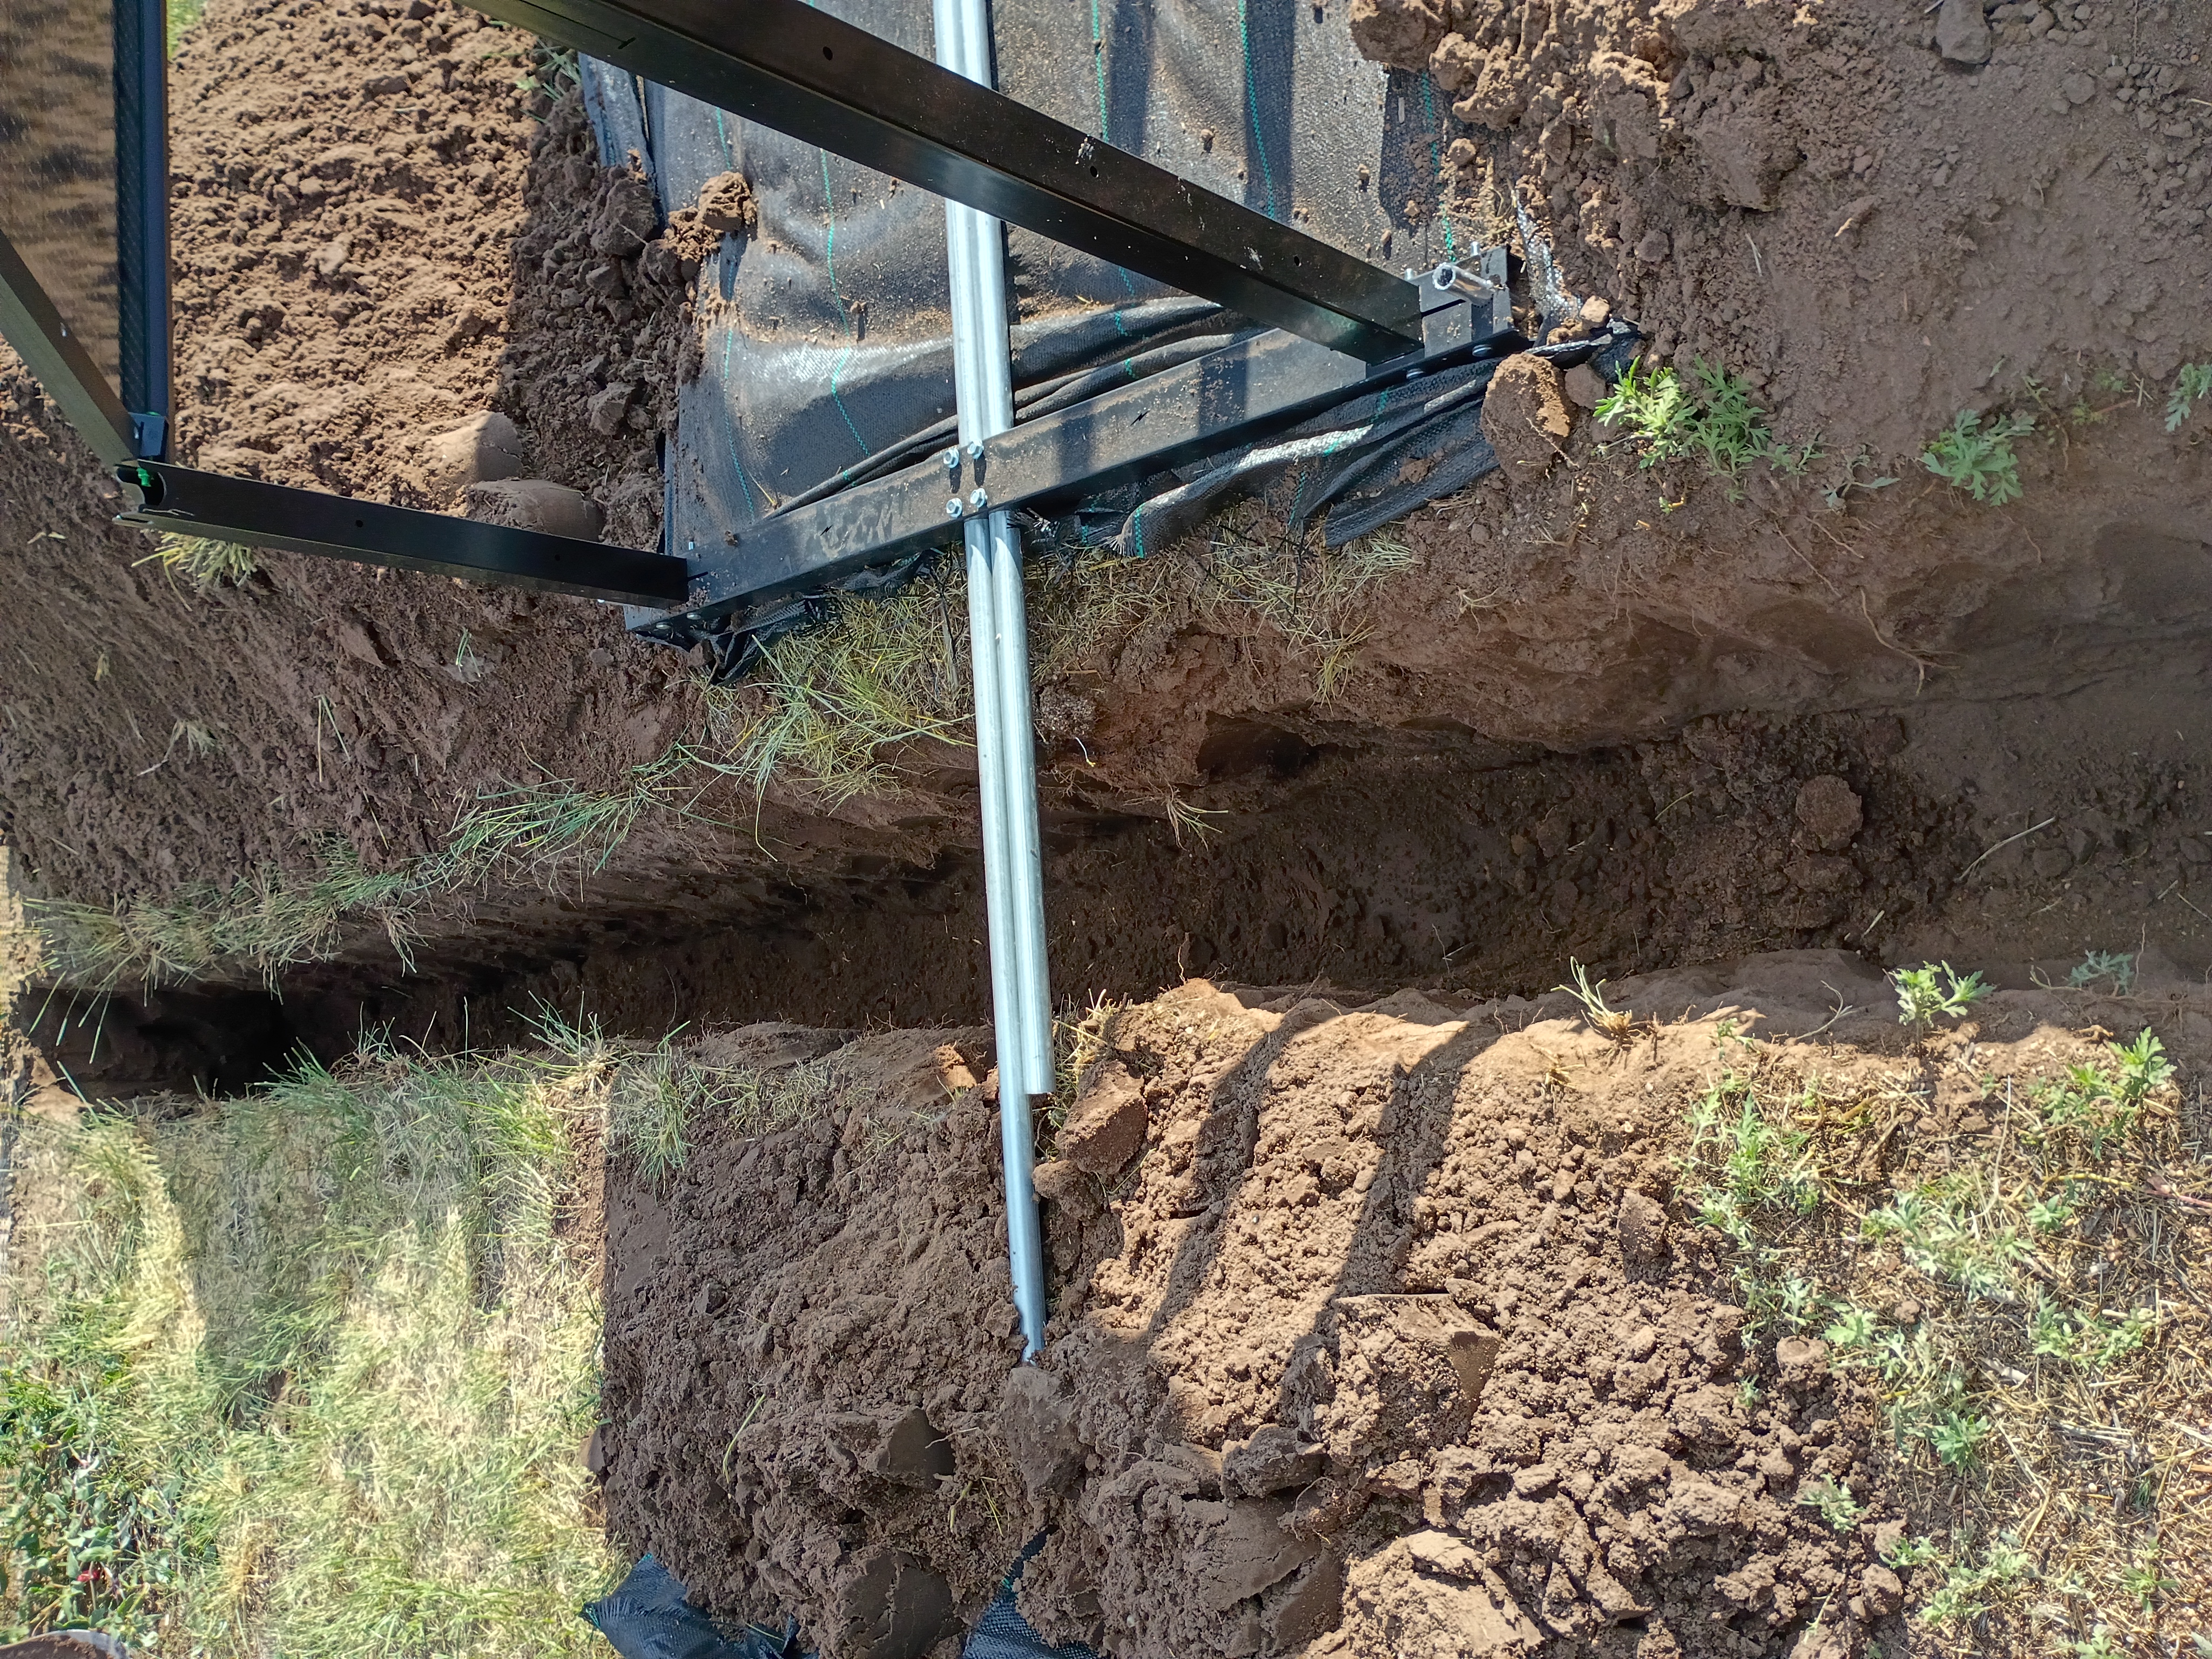
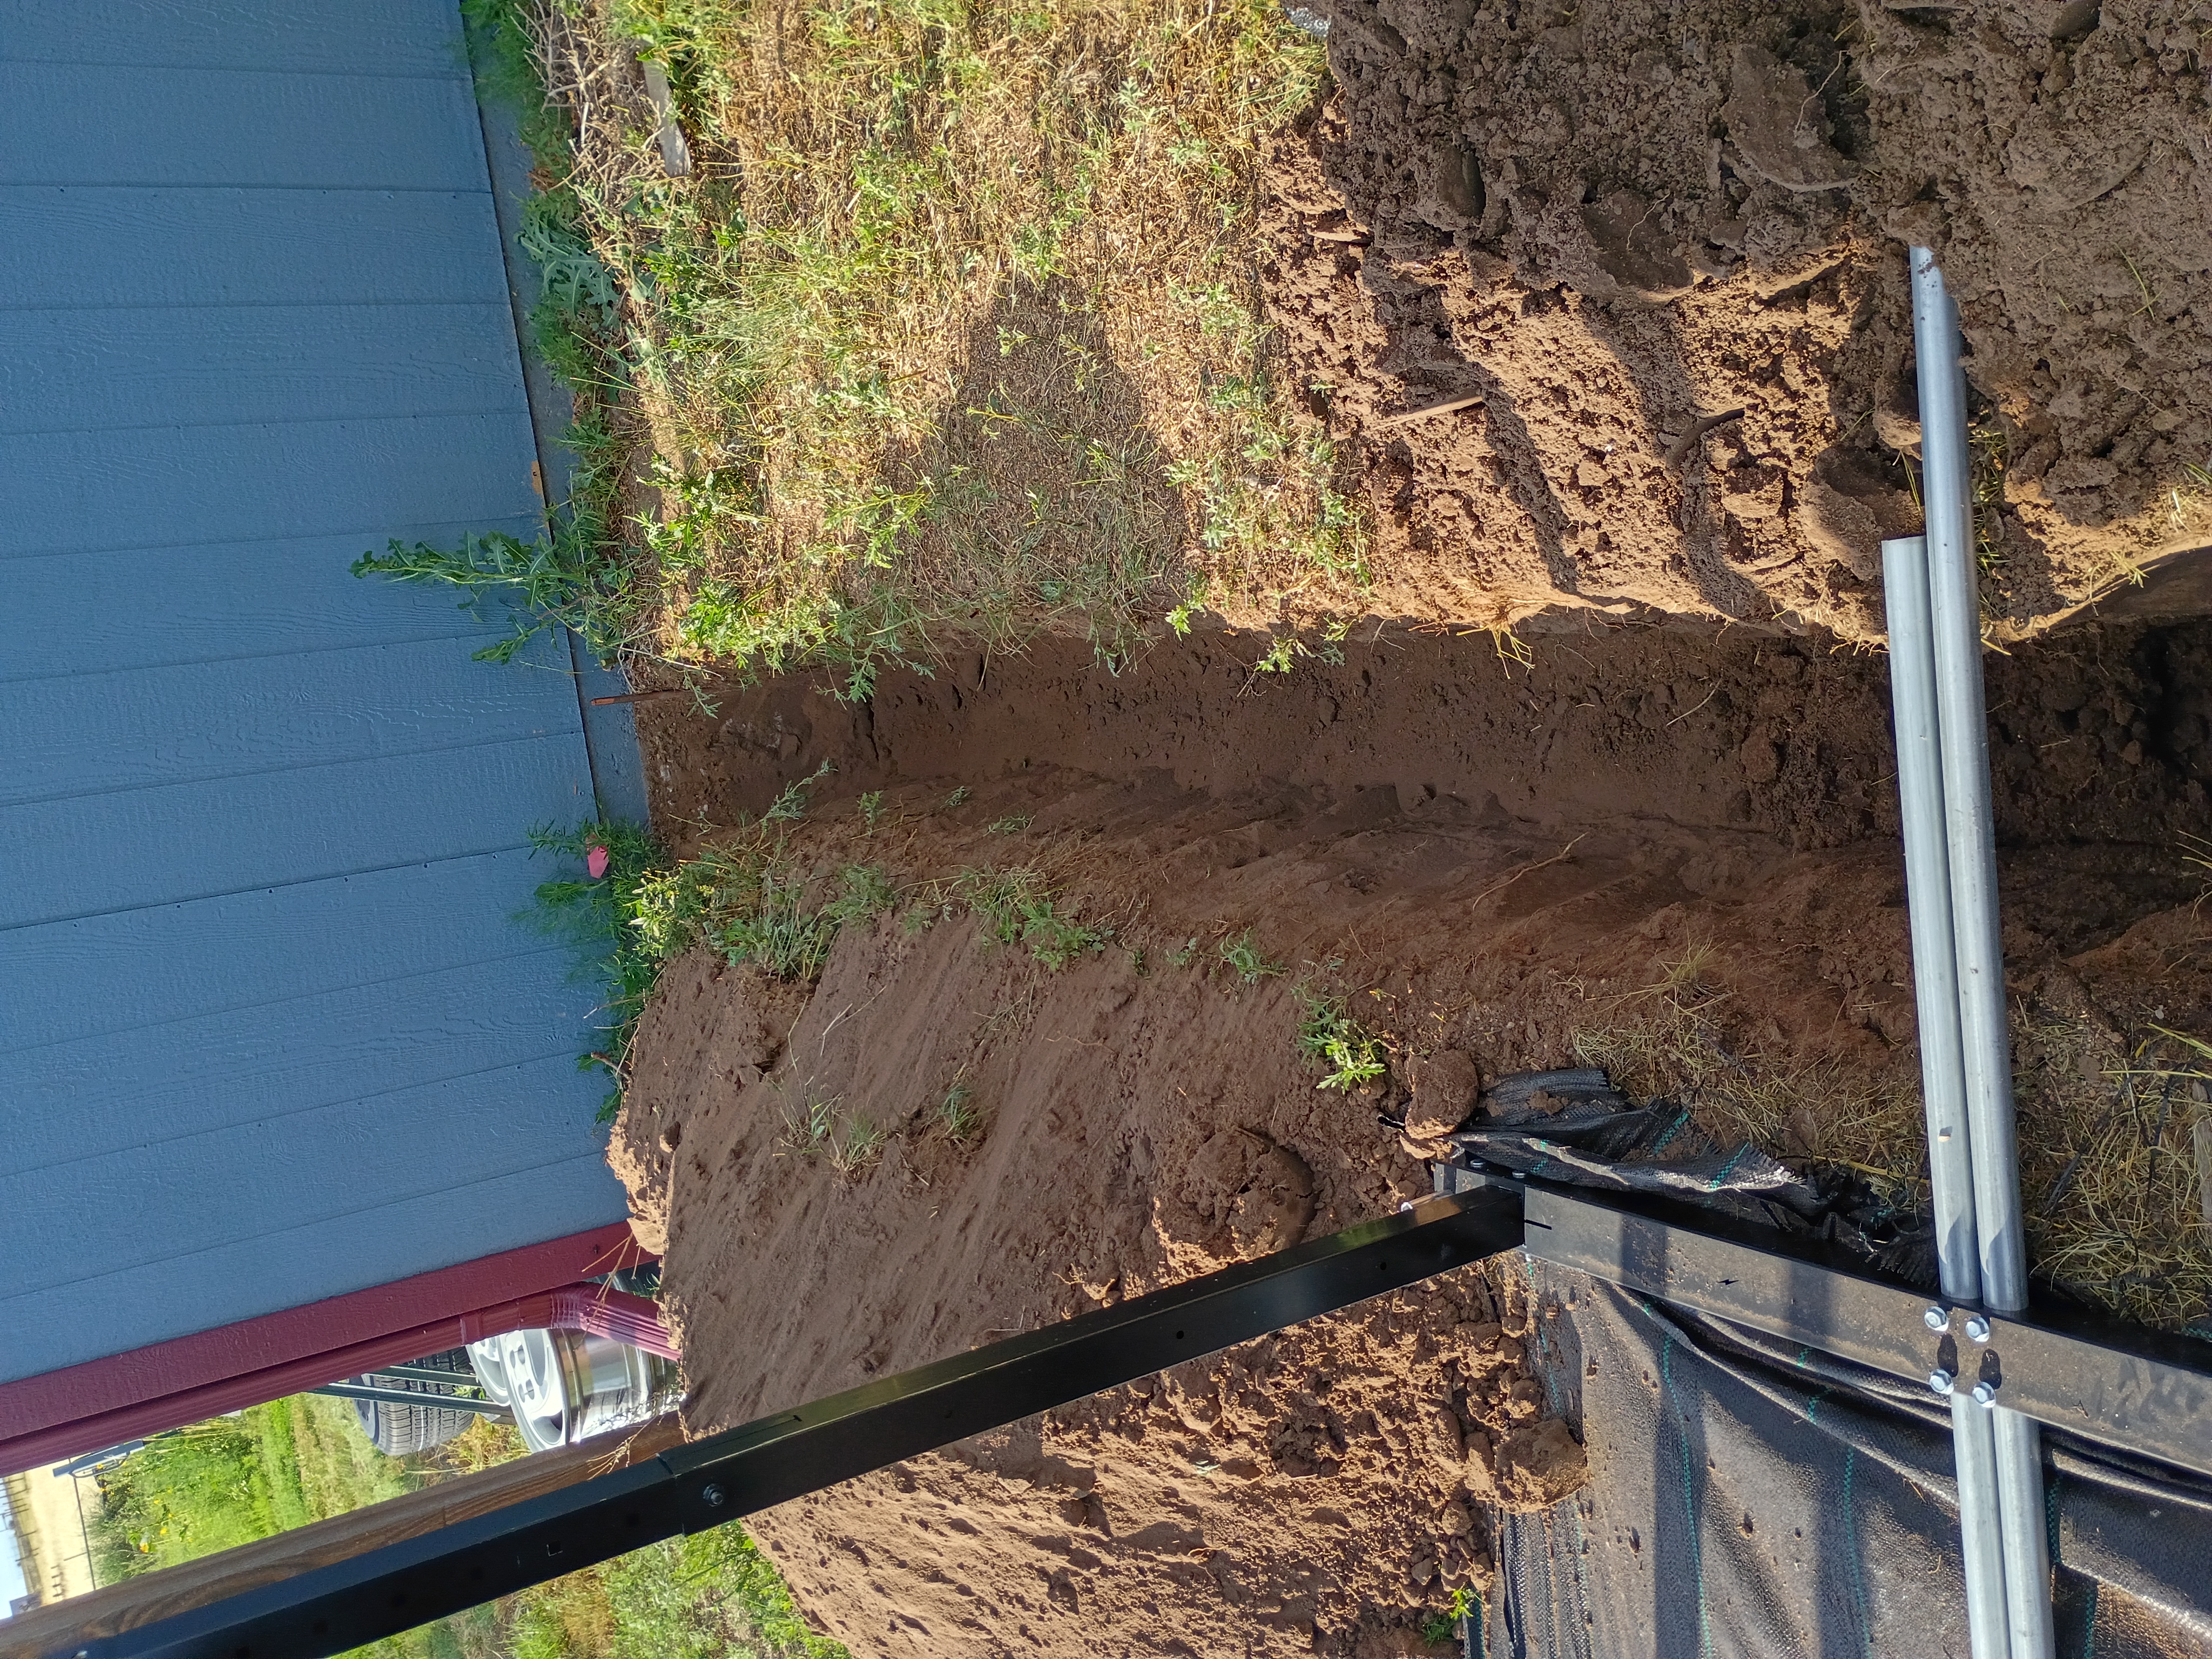
Solar project Into the Trenches
- Details
- Written by: ken
- Category: Uncategorised
- Hits: 374
I have now got the trench dug to 24 inches and then the weather hit and I have not been able to place the schedule 80 pipe. Here is the pics of the trend
Solar Project
- Details
- Written by: ken
- Category: Uncategorised
- Hits: 1057
So you all have been wondering what I have been doing and not posting for a while. Well, I have been testing out TrueNasScale and other things then my home lab fried. So, My Router project has been on hold. Definitely thinking with going with OPNSense. Also, been busy collecting parts for new type of Tech project for me. I have been purchasing parts for an Off-Grid Solar system for my Property. I have been collecting the Big parts from www.signaturesolar.com. It has been a three year journey so far buying the parts. Paying it off and then working on the next collection of parts.
Oh. wait, I guess I should talk about the journey that got me started down this path. I bought a piece property that has a house and a detached garage. I have had it for some time renovating it, again fixing something then paying it off. Well, I need a place to run power tools out of the weather. So, I tried running the saws and heavy current draw tools from the little outlet in the garage only to find out it would constantly blow the breaker in the house.
See the detached garage was added to the property about 15 years or so later and the owner never paid to have it wired up, before I ever bought property from them. So, I asked one local electrical company to quote me how much it would to get power to this garage. It would have been well over $12k dollars to pull a wire from the back of the property to the garage and does not include wiring the garage. So, I sent in motion the idea of an off-grid solar system. I did a lot of research and waited patiently until prices came down since I am a bit of handy man.
Youtube was my friend as well as the internet. Then, I got introduced to do it yourself (DIY) solar and www.signaturesolar.com. They recommended the EG4 6000xp and two batteries. But, my idea was to be forward thinking and plan to extend this resource of power to the house.
Well, I bought the EG4 6000xp inverter, But, shied away from the batteries at the time. I knew I needed more battery backup capacity and one more inverter. So, I bought my first set of 12 solar panels, paid it off, and then bought the All in one inverter. I then bought the second set of 12 solar panels. These were bought from Signature Solar (S2) . I then started researching batteries trying to find the capacity I needed in Lithium Iron Phosphate batteries (LifePo4).
Also, I bought my two initial EG4 Brightmount ground mount systems, and 5 inch extensions. I was able to mount the first 8 panels of 400 watt bifacial solar panels up. I went to buy more of these older ground mounts and they were no longer available. Then, I got introduced to the IntegraRack ground mount systems. I bought mine from https://solarpowerdistributors.com. Specifically these https://solarpowerdistributors.com/new-ir-40fsab-ballastrack-fixed-adjustable-angle-solar-module-ground-mount-racking-system/
I am going with the ground spike mounting system and following up with some ballast in the future.
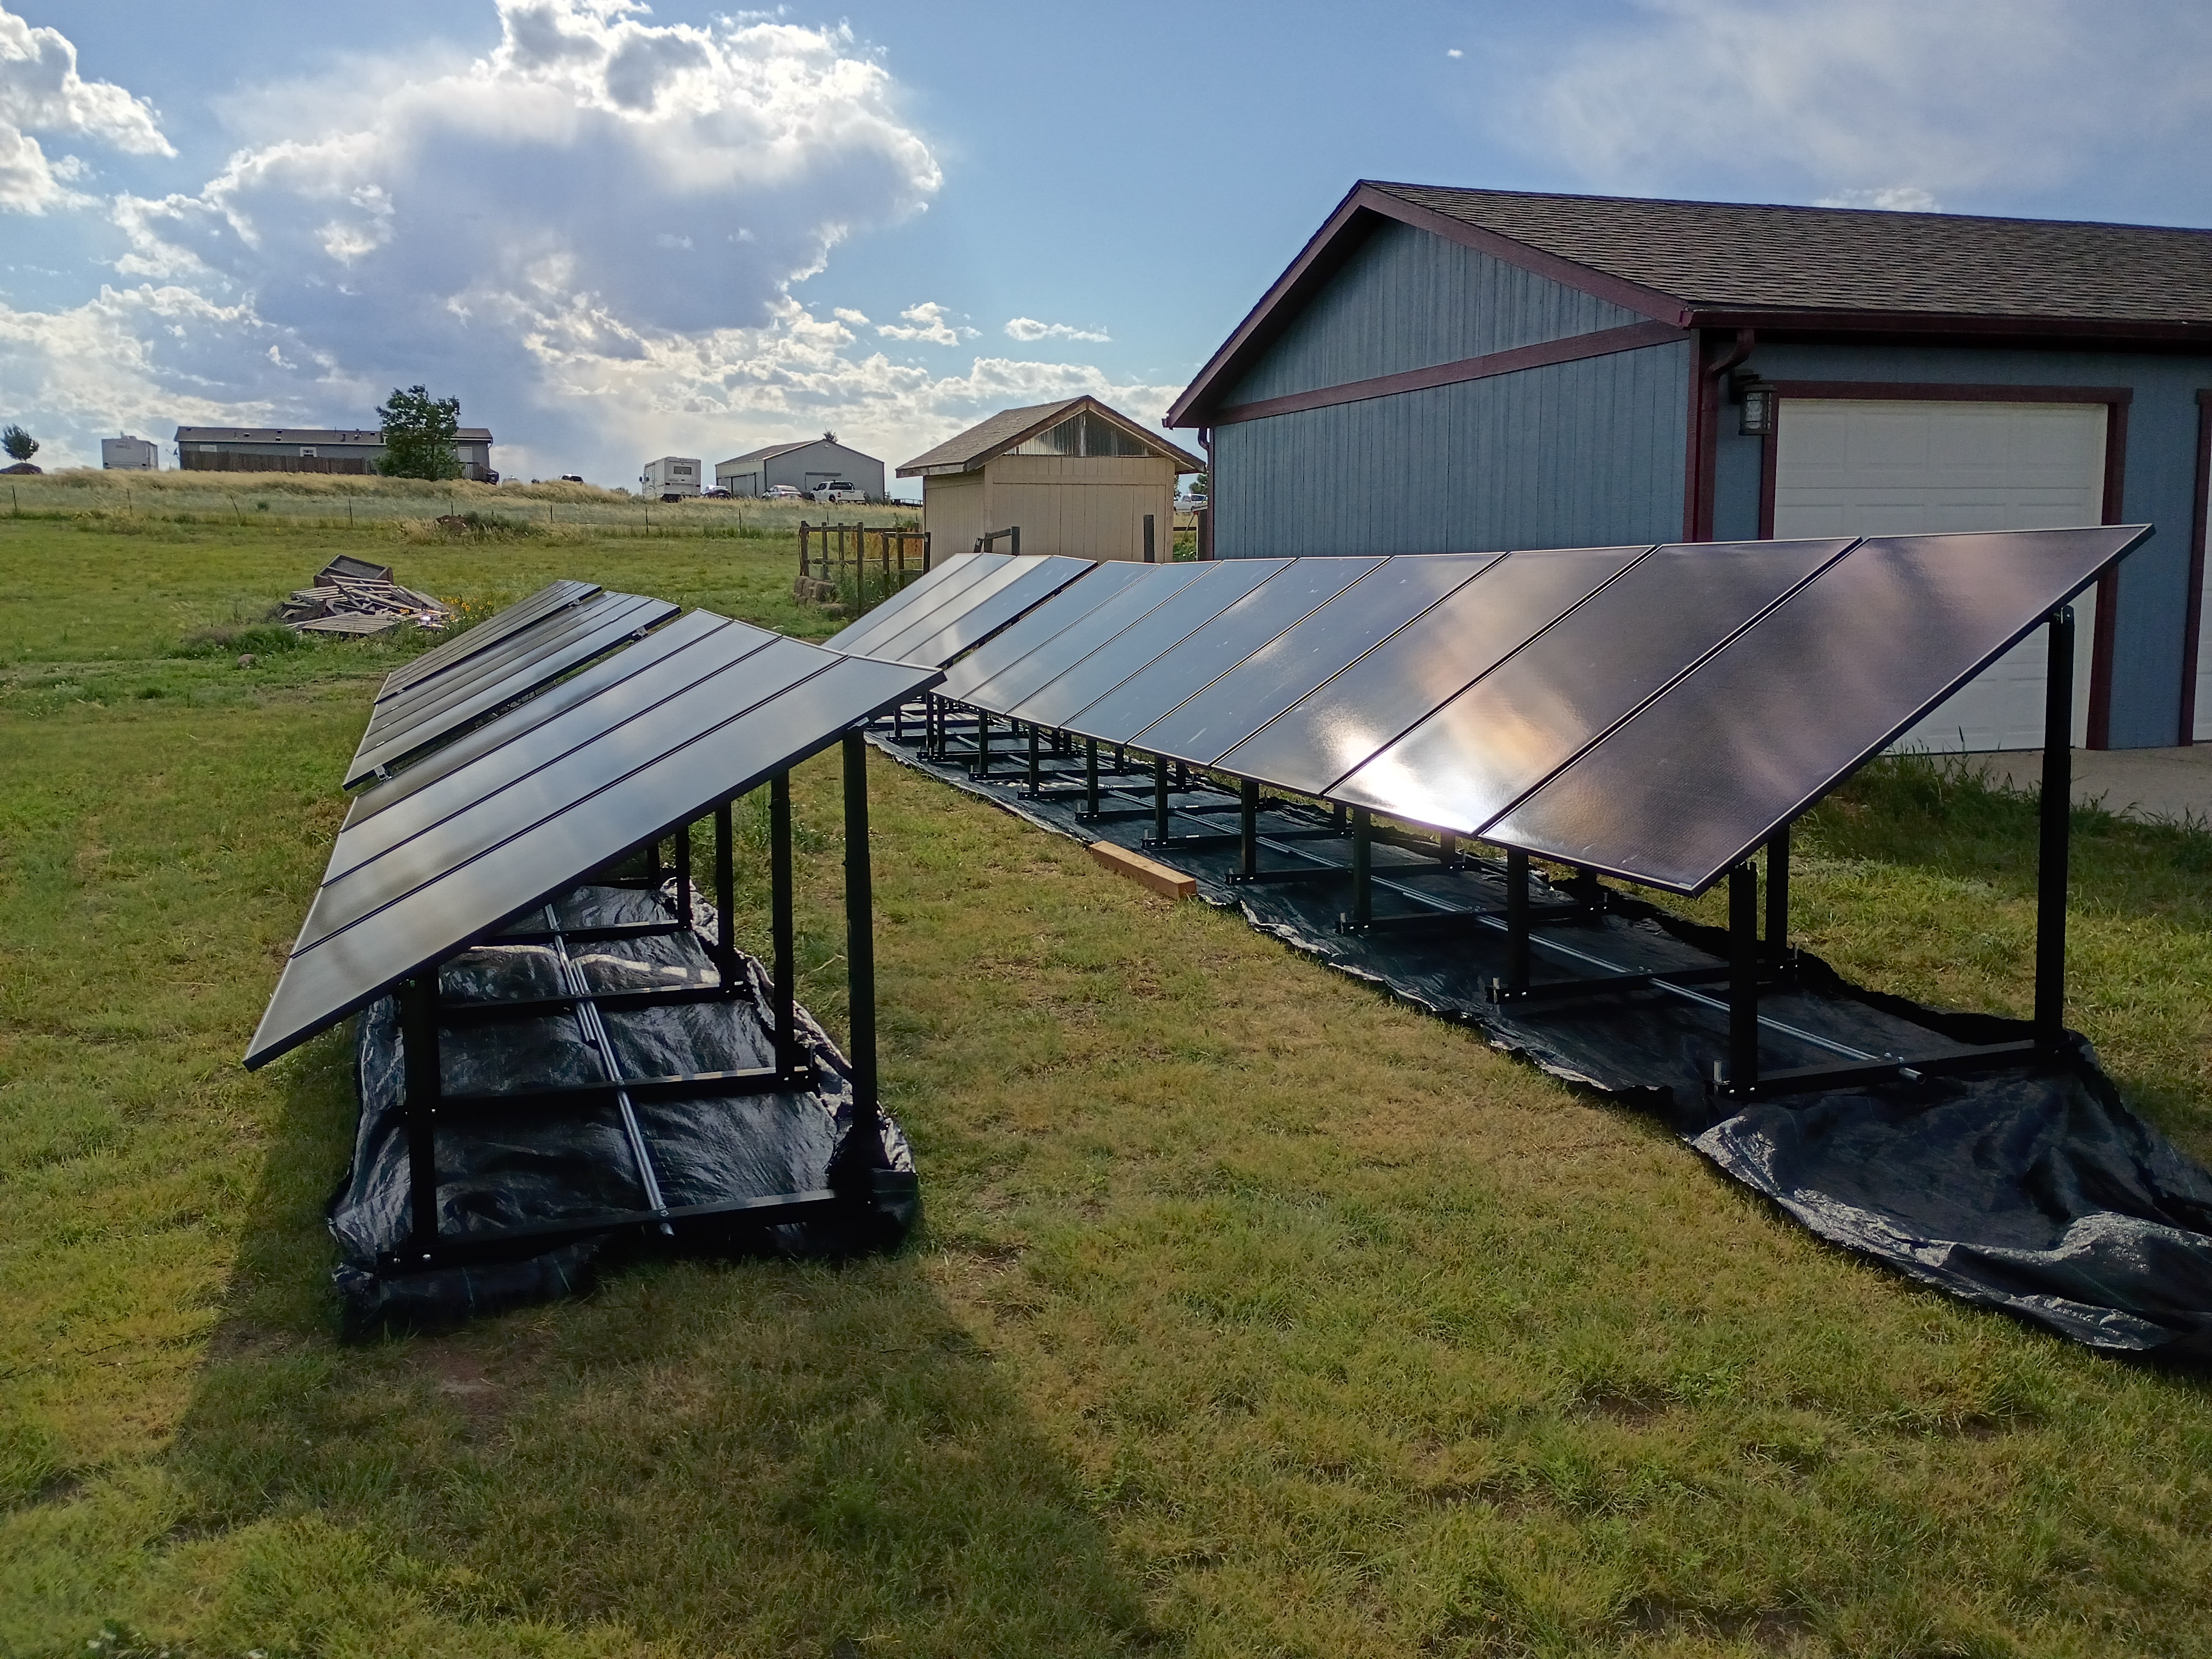
I purchased enough mounts to get last 16 solar panels out to the south side of the garage as seen in the picture. I got the inverter on the prepared garage wall and a 200 Amp Eaton breaker panel I had for a while.
So at this point, I am nearly complete on my parts collection. I am awaiting some DIY battery cases to come in as well as the LifePo4 battery cells to arrive.
So the next challenge is to learn how to get permits to wire up the garage for power to include garage door openers, and get the cost to extend this to the house. I may have to hire an electrician at this point.
Here is a sample picture of the solar panels up on the racking. My ground is not totally level and I will fix that in the future. Once that is done, I can work on the Router and repair the home lab Hyper-v system.
Page 1 of 3